VPP on FreeBSD - Part 1
About this series
![]()
Ever since I first saw VPP - the Vector Packet Processor - I have been deeply impressed with its performance and versatility. For those of us who have used Cisco IOS/XR devices, like the classic ASR (aggregation services router), VPP will look and feel quite familiar as many of the approaches are shared between the two. Over the years, folks have asked me regularly “What about BSD?” and to my surprise, late last year I read an announcement from the FreeBSD Foundation [ref] as they looked back over 2023 and forward to 2024:
Porting the Vector Packet Processor to FreeBSD
Vector Packet Processing (VPP) is an open-source, high-performance user space networking stack that provides fast packet processing suitable for software-defined networking and network function virtualization applications. VPP aims to optimize packet processing through vectorized operations and parallelism, making it well-suited for high-speed networking applications. In November of this year, the Foundation began a contract with Tom Jones, a FreeBSD developer specializing in network performance, to port VPP to FreeBSD. Under the contract, Tom will also allocate time for other tasks such as testing FreeBSD on common virtualization platforms to improve the desktop experience, improving hardware support on arm64 platforms, and adding support for low power idle on Intel and arm64 hardware.
I reached out to Tom and introduced myself – and IPng Networks – and offered to partner. Tom knows FreeBSD very well, and I know VPP very well. And considering lots of folks have asked me that loaded “What about BSD?” question, I think a reasonable answer might now be: Coming up! Tom will be porting VPP to FreeBSD, and I’ll be providing a test environment with a few VMs, physical machines with varying architectures (think single-numa, AMD64 and Intel platforms).
In this first article, let’s take a look at tablestakes: installing FreeBSD 14.0-RELEASE and doing all the little steps necessary to get VPP up and running.
My test setup
Tom and I will be using two main test environments. The first is a set of VMs running on QEMU, which
we can do functional testing on, by configuring a bunch of VPP routers with a set of normal FreeBSD
hosts attached to them. The second environment will be a few Supermicro bare metal servers that
we’ll use for performance testing, notably to compare the FreeBSD kernel routing, fancy features
like netmap, and of course VPP itself. I do intend to do some side-by-side comparisons between
Debian and FreeBSD when they run VPP.
If you know me a little bit, you’ll know that I typically forget how I did a thing, so I’m using this article for others as well as myself in case I want to reproduce this whole thing 5 years down the line. Oh, and if you don’t know me at all, now you know my brain, pictured left, is not too different from a leaky sieve.
VMs: IPng Lab
I really like the virtual machine environment that the [IPng Lab] provides. So my very first step is to grab an UFS based image like [these ones], and I prepare a lab image. This goes roughly as follows –
- Download the UFS qcow2 and
unxzit. - Create a 10GB ZFS blockdevice
zfs create ssd-vol0/vpp-proto-freebsd-disk0 -V10G - Make a copy of my existing vpp-proto-bookworm libvirt config, and edit it with new MAC addresses,
UUID and hostname (essentially just an
s/bookworm/freebsd/g - Boot the VM once using VNC, to add serial booting to
/boot/loader.conf - Finally, install a bunch of stuff that I would normally use on a FreeBSD machine:
- A user account ‘pim’ and ‘ipng’, set the ‘root’ password
- A bunch of packages (things like vim, bash, python3, rsync)
- SSH host keys and
authorized_keysfiles - A sensible
rc.confthat DHCPs on its first network cardvtnet0
I notice that FreeBSD has something pretty neat in rc.conf, called growfs_enable, which will
take a look at the total disk size available in slice 4 (the one that contains the main filesystem),
and if the disk has free space beyond the end of the partition, it’ll slurp it up and resize the
filesystem to fit. Reading the /etc/rc.d/growfs file, I see that this works for both ZFS and UFS.
A chef’s kiss that I found super cool!
Next, I take a snapshot of the disk image and add it to the Lab’s zrepl configuration, so that
this base image gets propagated to all hypervisors, the result is a nice 10GB large base install
that boots off of serial.
pim@hvn0-chbtl0:~$ zfs list -t all | grep vpp-proto-freebsd
ssd-vol0/vpp-proto-freebsd-disk0                                                           13.0G  45.9G     6.14G  -
ssd-vol0/vpp-proto-freebsd-disk0@20240206-release                                           614M      -     6.07G  -
ssd-vol0/vpp-proto-freebsd-disk0@20240207-release                                          3.95M      -     6.14G  -
ssd-vol0/vpp-proto-freebsd-disk0@20240207-2                                                   0B      -     6.14G  -
ssd-vol0/vpp-proto-freebsd-disk0#zrepl_CURSOR_G_760881003460c452_J_source-vpp-proto            -      -     6.14G  -
One note for the pedants – the kernel that ships with Debian, for some reason I don’t quite understand, does not come with an UFS kernel module that allows to mount these filesystems read-write. Maybe this is because there are a few different flavors of UFS out there, and the maintainer of that kernel module is not comfortable enabling write-mode on all of them. I don’t know, but my use case isn’t critical as my build will just copy a few files on the otherwise ephemeral ZFS cloned filesystem.
So off I go, asking Summer to build me a Linux 6.1 kernel for Debian Bookworm (which is what the hypervisors are running). For those following along at home, here’s how that looked like for me:
pim@summer:/usr/src$ sudo apt-get install build-essential linux-source bc kmod cpio flex \
  libncurses5-dev libelf-dev libssl-dev dwarves bison
pim@summer:/usr/src$ sudo apt install linux-source-6.1
pim@summer:/usr/src$ sudo tar xf linux-source-6.1.tar.xz
pim@summer:/usr/src$ cd linux-source-6.1/
pim@summer:/usr/src/linux-source-6.1$ sudo cp /boot/config-6.1.0-16-amd64 .config
pim@summer:/usr/src/linux-source-6.1$ cat << EOF | sudo tee -a .config
CONFIG_UFS_FS=m
CONFIG_UFS_FS_WRITE=y
EOF
pim@summer:/usr/src/linux-source-6.1$ sudo make menuconfig
pim@summer:/usr/src/linux-source-6.1$ sudo make -j`nproc` bindeb-pkg
Finally, I add a new LAB overlay type called freebsd to the Python/Jinja2 tool I built, which I
use to create and maintain the LAB hypervisors. If you’re curious about this part, take a look at
the [article] I wrote about the environment. I reserve LAB #2
running on hvn2.lab.ipng.ch for the time being, as LAB #0 and #1 are in use by other projects. To
cut to the chase, here’s what I type to generate the overlay and launch a LAB using the FreeBSD I
just made. There’s not much in the overlay, really just some templated rc.conf to set the correct
hostname and mgmt IPv4/IPv6 addresses and so on.
pim@lab:~/src/lab$ find overlays/freebsd/ -type f
overlays/freebsd/common/home/ipng/.ssh/authorized_keys.j2
overlays/freebsd/common/etc/rc.local.j2
overlays/freebsd/common/etc/rc.conf.j2
overlays/freebsd/common/etc/resolv.conf.j2
overlays/freebsd/common/root/lab-build/perms
overlays/freebsd/common/root/.ssh/authorized_keys.j2

pim@lab:~/src/lab$ ./generate --host hvn2.lab.ipng.ch --overlay freebsd
pim@lab:~/src/lab$ export BASE=vol0/hvn0.chbtl0.ipng.ch/ssd-vol0/vpp-proto-freebsd-disk0@20240207-2
pim@lab:~/src/lab$ OVERLAY=freebsd LAB=2 ./create
pim@lab:~/src/lab$ LAB=2 ./command start
After rebooting the hypervisors with their new UFS2-write-capable kernel, I can finish the job and
create the lab VMs. The create call above first makes a ZFS clone of the base image, then mounts
it, rsyncs the generated overlay files over it, then creates a ZFS snapshot called @pristine,
before booting up the seven virtual machines that comprise this spiffy new FreeBSD lab:

I decide to park the LAB for now, as that beautiful daisy-chain of vpp2-0 - vpp2-3 routers will
first need a working VPP install, which I don’t quite have yet.
Bare Metal
Next, I take three spare Supermicro SYS-5018D-FN8T, which have the following specs:
- Full IPMI support (power, serial-over-lan and kvm-over-ip with HTML5), on a dedicated network port.
- A 4-core, 8-thread Xeon D1518 CPU which runs at 35W TDP
- Two independent Intel i210 NICs (Gigabit)
- A Quad Intel i350 NIC (Gigabit)
- Two Intel X552 (TenGigabitEthernet)
- Two Intel X710-XXV (TwentyFiveGigabitEthernet) ports in the PCIe v3.0 x8 slot
- m.SATA 120G boot SSD
- 2x16GB of ECC RAM
These were still arranged in a test network from when Adrian and I worked on the [VPP MPLS] project together, and back then I called the three machines
France, Belgium and Netherlands. I decide to reuse that, and save myself some recabling.
Using IPMI, I install the France server with FreeBSD, while the other two, for now, are still
running Debian. This can be useful for (a) side by side comparison tests and (b) to be able to
quickly run some T-Rex loadtests.

I have to admit - I love Supermicro’s IPMI implementation. Being able to plop in an ISO over Samba, and the boot on VGA, including into the BIOS to set/change things, and then completely reinstall while hanging out on the couch while drinking tea, absolutetey
Starting Point
I use the base image I described above to clone a beefy VM for building and development purposes. I give that machine 32GB of RAM and 24 cores on one of IPng’s production hypervisors. I spent some time with Tom this week to go over a few details about the build, and he patiently described where he’s at with the porting. It’s not done yet, but he has good news: it does compile cleanly on his machine, so there is hope for me yet! He has prepared a GitHub repository with all of the changes staged - and he will be sequencing them out one by one to merge upstream. In case you want to follow along with his work, take a look at this [Gerrit search].
First, I need to go build a whole bunch of stuff. Here’s a recap –
- Download ports and kernel source
- Build and install a GENERIC kernel
- Build DPDK including its FreeBSD kernel modules
contigmemandnic_uio - Build netmap
bridgeutility - Build VPP :)
To explain a little bit: Linux has hugepages which are 2MB or 1GB memory pages. These come with a
significant performance benefit, mostly because the CPU will have a table called the Translation
Lookaside Buffer or [TLB] which keeps
a mapping between virtual and physical memory pages. If there is too much memory allocated to a
process, this TLB table thrashes which comes at a performance penalty. When allocating not the
standard 4kB pages, but larger 2MB or 1GB ones, this does not happen. For FreeBSD, the DPDK library
provides an equivalent kernel module, which is called contigmem.
Many (but not all!) DPDK poll mode drivers will remove the kernel network card driver and rebind the
network card to a Userspace IO or UIO driver. DPDK also ships one of these for FreeBSD, called
nic_uio. So my first three steps are compiling all of these things, including a standard DPDK
install from ports.
Build: FreeBSD + DPDK
Building things on FreeBSD is all very well documented in the [FreeBSD
Handbook].
In order to avoid filling up the UFS boot disk, I snuck in another SAS-12 SSD to get a bit
faster builds, and I mount /usr/src and /usr/obj on it.
Here’s a recap of what I ended up doing to build a fresh GENERIC kernel and the DPDK port:
[pim@freebsd-builder ~]$ sudo zfs create -o mountpoint=/usr/src ssd-vol0/src
[pim@freebsd-builder ~]$ sudo zfs create -o mountpoint=/usr/obj ssd-vol0/obj
[pim@freebsd-builder ~]$ sudo git clone --branch stable/14 https://git.FreeBSD.org/src.git /usr/src
[pim@freebsd-builder /usr/src]$ sudo make buildkernel KERNCONF=GENERIC
[pim@freebsd-builder /usr/src]$ sudo make installkernel KERNCONF=GENERIC
[pim@freebsd-builder ~]$ sudo git clone https://git.FreeBSD.org/ports.git /usr/ports
[pim@freebsd-builder /usr/ports/net/dpdk ]$ sudo make install
I patiently answer a bunch of questions (all of them just with the default) when the build process
asks me what I want. DPDK is a significant project, and it pulls in lots of dependencies to build as
well. After what feels like an eternity, the builds are complete, and I have a kernel together with
kernel modules, as well as a bunch of handy DPDK helper utilities (like dpdk-testpmd) installed.
Just to set expectations – the build took about an hour for me from start to finish (on a 32GB machine
with 24 vCPUs), so hunker down if you go this route.
NOTE: I wanted to see what I was being asked in this build process, but since I ended up answering
everything with the default, you can feel free to add BATCH=yes to the make of DPDK (and see the man
page of dpdk(7) for details).
Build: contigmem and nic_uio
Using a few sysctl calls, I can configure four buffers of 1GB each, which will serve as my
equivalent hugepages from Linux, and I add the following to /boot/loader.conf, so that these
contiguous regions are reserved early in the boot cycle, when memory is not yet fragmented:
hw.contigmem.num_buffers=4
hw.contigmem.buffer_size=1073741824
contigmem_load="YES"
To figure out which network devices to rebind to the UIO driver, I can inspect the PCI bus with the
pciconf utility:
[pim@freebsd-builder ~]$ pciconf -vl | less
...
virtio_pci0@pci0:1:0:0: class=0x020000 rev=0x01 hdr=0x00 vendor=0x1af4 device=0x1041 subvendor=0x1af4 subdevice=0x1100
    vendor     = 'Red Hat, Inc.'
    device     = 'Virtio 1.0 network device'
    class      = network
    subclass   = ethernet
virtio_pci1@pci0:1:0:1: class=0x020000 rev=0x01 hdr=0x00 vendor=0x1af4 device=0x1041 subvendor=0x1af4 subdevice=0x1100
    vendor     = 'Red Hat, Inc.'
    device     = 'Virtio 1.0 network device'
    class      = network
    subclass   = ethernet
virtio_pci0@pci0:1:0:2: class=0x020000 rev=0x01 hdr=0x00 vendor=0x1af4 device=0x1041 subvendor=0x1af4 subdevice=0x1100
    vendor     = 'Red Hat, Inc.'
    device     = 'Virtio 1.0 network device'
    class      = network
    subclass   = ethernet
virtio_pci1@pci0:1:0:3: class=0x020000 rev=0x01 hdr=0x00 vendor=0x1af4 device=0x1041 subvendor=0x1af4 subdevice=0x1100
    vendor     = 'Red Hat, Inc.'
    device     = 'Virtio 1.0 network device'
    class      = network
    subclass   = ethernet
My virtio based network devices are on PCI location 1:0:0 – 1:0:3 and I decide to take away the
last two, which makes my final loader configuration for the kernel:
[pim@freebsd-builder ~]$ cat /boot/loader.conf
kern.geom.label.disk_ident.enable=0
zfs_load=YES
boot_multicons=YES
boot_serial=YES
comconsole_speed=115200
console="comconsole,vidconsole"
hw.contigmem.num_buffers=4
hw.contigmem.buffer_size=1073741824
contigmem_load="YES"
nic_uio_load="YES"
hw.nic_uio.bdfs="1:0:2,1:0:3"
Build: Results
Now that all of this is done, the machine boots with these drivers loaded, and I can see only my
first two network devices (vtnet0 and vtnet1), while the other two are gone. This is good news,
because that means they are now under control of the DPDK nic_uio kernel driver, whohoo!
[pim@freebsd-builder ~]$ kldstat
Id Refs Address                Size Name
 1   28 0xffffffff80200000  1d36230 kernel
 2    1 0xffffffff81f37000     4258 nic_uio.ko
 3    1 0xffffffff81f3c000   5d5618 zfs.ko
 4    1 0xffffffff82513000     5378 contigmem.ko
 5    1 0xffffffff82c18000     3250 ichsmb.ko
 6    1 0xffffffff82c1c000     2178 smbus.ko
 7    1 0xffffffff82c1f000     430c virtio_console.ko
 8    1 0xffffffff82c24000     22a8 virtio_random.ko
Build: VPP
Tom has prepared a branch on his GitHub account, which poses a few small issues with the build.
Notably, we have to use a few GNU tools like gmake. But overall, I find the build is very straight
forward - kind of looking like this:
[pim@freebsd-builder ~]$ sudo pkg install py39-ply git gmake gsed cmake libepoll-shim gdb python3 ninja
[pim@freebsd-builder ~/src]$ git clone git@github.com:adventureloop/vpp.git
[pim@freebsd-builder ~/src/vpp]$ git checkout freebsd-vpp
[pim@freebsd-builder ~]$ gmake install-dep
[pim@freebsd-builder ~]$ gmake build
Results
Now, taking into account that not everything works (for example there isn’t a packaging yet, let alone something as fancy as a port), and that there’s a bit of manual tinkering going on, let me show you at least the absolute gem that is this screenshot:
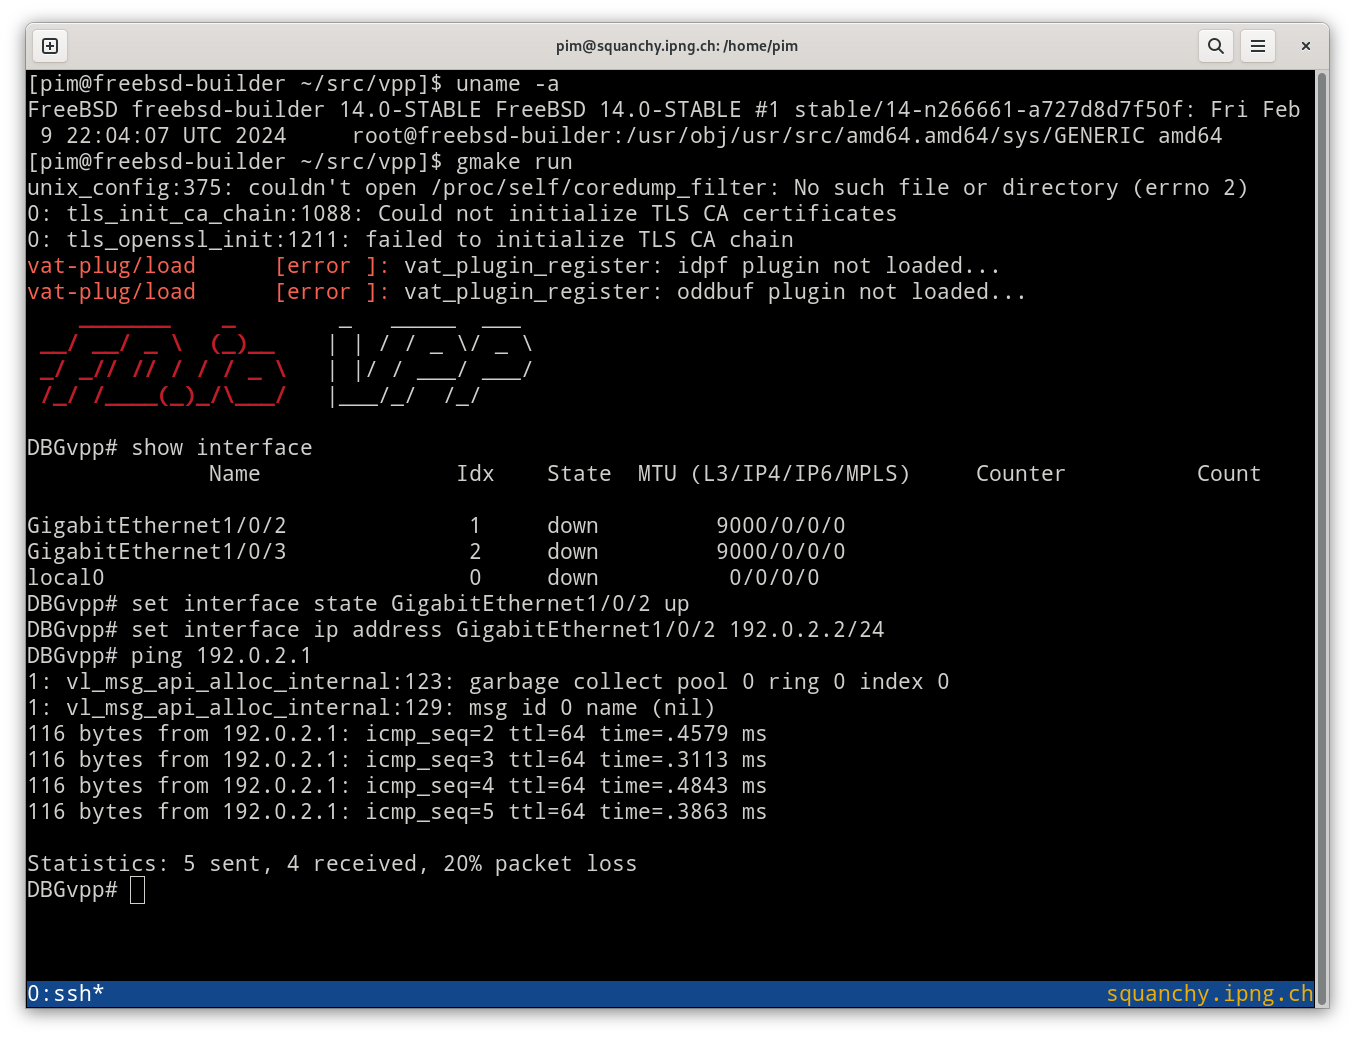
The (debug build) VPP instance started, the DPDK plugin loaded, and it found the two devices that
were bound by the newly installed nic_uio driver. Setting an IPv4 address on one of these
interfaces works, and I can ping another machine on the LAN connected to Gi10/0/2, which I find
dope.
Hello, World!
What’s next ?
There’s a lot of ground to cover with this port. While Tom munches away at the Gerrits he has stacked up, I’m going to start kicking the tires on the FreeBSD machines. I showed in this article the tablestakes preparation, giving a FreeBSD lab on the hypervisors, a build machine that has DPDK, kernel and VPP in a somewhat working state (with two NICs in VirtIO), and I installed a Supermicro bare metal machine to do the same.
In a future set of articles in this series, I will:
- Do a comparative loadtest between FreeBSD kernel, Netmap, VPP+Netmap, and VPP+DPDK
- Take a look at how FreeBSD stacks up against Debian on the the same machine
- Do a bit of functional testing, to ensure dataplane functionality is in place
A few things will need some attention:
- Some Linux details have leaked, for example
show cpuandshow pciin VPP - Linux Control Plane uses TAP devices which Tom has mentioned may need some work
- Similarly, Linux Control Plane netlink handling may or may not work as expected in FreeBSD
- Build and packaging, obviously there is no
make pkg-deb