VPP Lab - Setup

Introduction
In a previous post (VPP Linux CP - Virtual Machine Playground), I wrote a bit about building a QEMU image so that folks can play with the Vector Packet Processor and the Linux Control Plane code. Judging by our access logs, this image has definitely been downloaded a bunch, and I myself use it regularly when I want to tinker a little bit, without wanting to impact the production routers at AS8298.
The topology of my tests has become a bit more complicated over time, and often just one router would not be
enough. Yet, repeatability is quite important, and I found myself constantly reinstalling / recheckpointing
the vpp-proto virtual machine I was using. I got my hands on some LAB hardware, so it’s time for an upgrade!
IPng Networks LAB - Physical
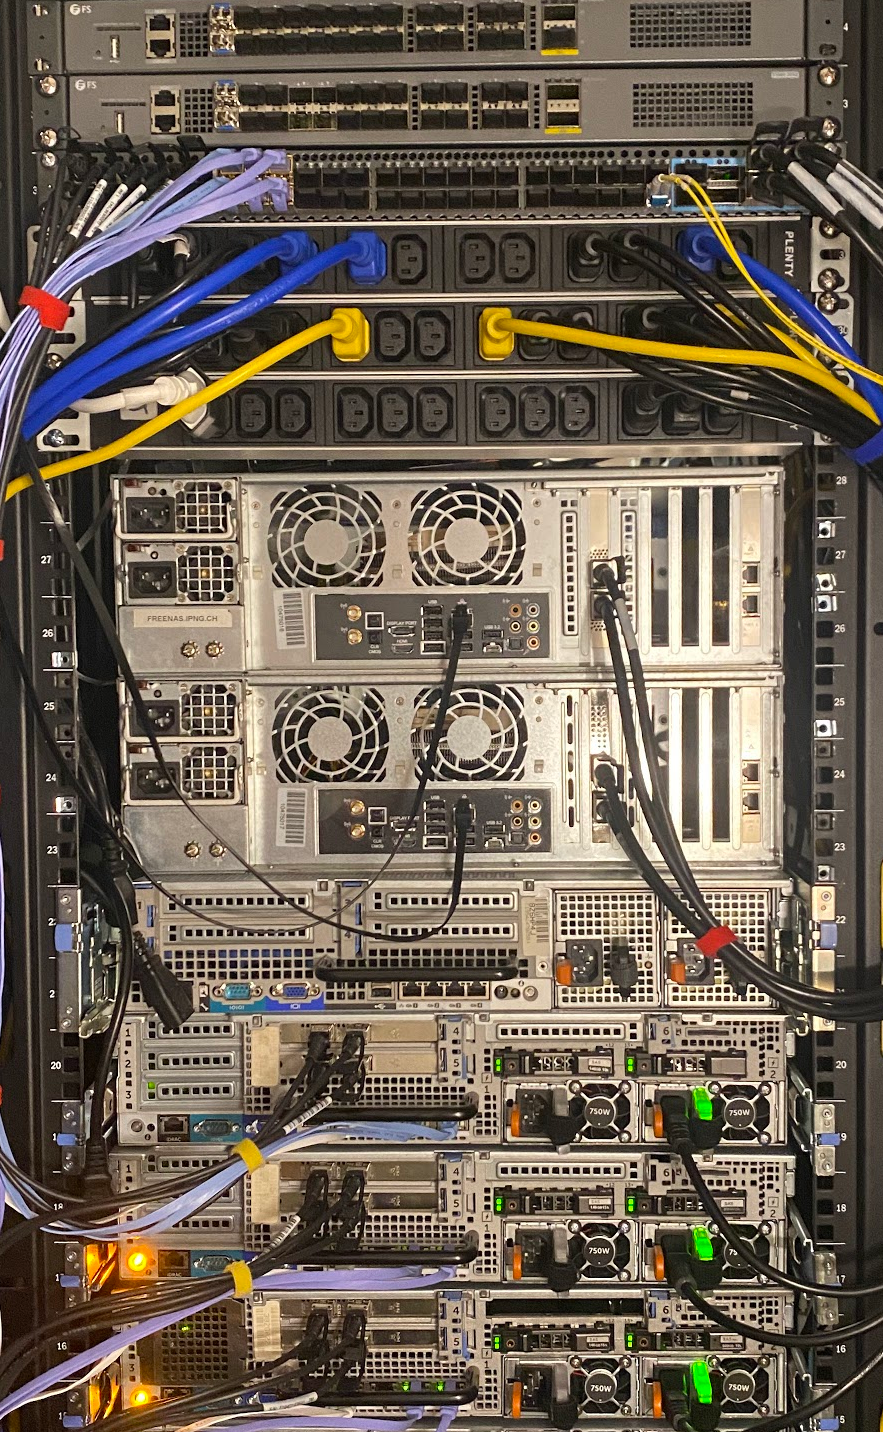
First, I specc’d out a few machines that will serve as hypervisors. From top to bottom in the picture here, two
FS.com S5680-20SQ switches – I reviewed these earlier [ref], and I really
like these, as they come with 20x10G, 4x25G and 2x40G ports, an OOB management port and serial to configure them.
Under it, is its larger brother, with 48x10G and 8x100G ports, the FS.com S5860-48SC. Although it’s a bit more
expensive, it’s also necessary because I often test VPP at higher bandwidth, and as such being able to make
ethernet topologies by mixing 10, 25, 40, 100G is super useful for me. So, this switch is fsw0.lab.ipng.ch
and dedicated to lab experiments.
Connected to the switch are my trusty Rhino and Hippo machines. If you remember that game Hungry Hungry Hippos
that’s where the name comes from. They are both Ryzen 5950X on ASUS B550 motherboard, with each 2x1G i350 copper
nics (pictured here not connected), and 2x100G i810 QSFP network cards (properly slotted in the motherboard’ss
PCIe v4.0 x16 slot).
Finally, three Dell R720XD machines serve as the to be built VPP testbed. They each come with 128GB of RAM, 2x500G
SSDs, two Intel 82599ES dual 10G NICs (four ports total), and four Broadcom BCM5720 1G NICs. The first 1G port is
connected to a management switch, and it doubles up as an IPMI speaker, so I can turn on/off the hypervisors
remotely. All four 10G ports are connected with DACs to fsw0-lab, as are two 1G copper ports (the blue UTP
cables). Everything can be turned on/off remotely, which is useful for noise, heat and overall the environment 🍀.
IPng Networks LAB - Logical

I have three of these Dell R720XD machines in the lab, and each one of them will run one complete lab environment,
consisting of four VPP virtual machines, network plumbing, and uplink. That way, I can turn on one hypervisor,
say hvn0.lab.ipng.ch, prepare and boot the VMs, mess around with it, and when I’m done, return the VMs to a
pristine state, and turn off the hypervisor. And, because I have three of these machines, I can run three separate
LABs at the same time, or one really big one spanning all the machines. Pictured on the right is a logical sketch
of one of the LABs (LAB id=0), with a bunch of VPP virtual machines, each four NICs daisychained together, with
a few NICs left for experimenting.
Headend
At the top of the logical environment, I am going to be using one of our production machines (hvn0.chbtl0.ipng.ch)
which will run a permanently running LAB headend, a Debian VM called lab.ipng.ch. This allows me to hermetically
seal the LAB environments, letting me run them entirely in RFC1918 space, and by forcing the LAbs to be connected
under this machine, I can ensure that no unwanted traffic enters or exits the network [imagine a loadtest at
100Gbit accidentally leaking, this may or totally may not have once happened to me before …].
Disk images
On this production hypervisor (hvn0.chbtl0.ipng.ch), I’ll also prepare and maintain a prototype vpp-proto disk
image, which will serve as a consistent image to boot the LAB virtual machines. This main image will be replicated
over the network into all three hvn0 - hvn2 hypervisor machines. This way, I can do periodical maintenance on the
main vpp-proto image, snapshot it, publish it as a QCOW2 for downloading (see my [VPP Linux CP - Virtual Machine
Playground] post for details on how it’s built and what you can do with it
yourself!). The snapshots will then also be sync’d to all hypervisors, and from there I can use simple ZFS filesystem
cloning and snapshotting to maintain the LAB virtual machines.
Networking
Each hypervisor will get an install of Open vSwitch, a production quality, multilayer virtual switch designed to
enable massive network automation through programmatic extension, while still supporting standard management interfaces
and protocols. This takes lots of the guesswork and tinkering out of Linux bridges in KVM/QEMU, and it’s a perfect fit
due to its tight integration with libvirt (the thing most of us use in Debian/Ubuntu hypervisors). If need be, I can
add one or more of the 1G or 10G ports as well to the OVS fabric, to build more complicated topologies. And, because
the OVS infrastructure and libvirt both allow themselves to be configured over the network, I can control all aspects
of the runtime directly from the lab.ipng.ch headend, not having to log in to the hypervisor machines at all. Slick!
Implementation Details
I start with image management. On the production hypervisor, I create a 6GB ZFS dataset that will serve as my vpp-proto
machine, and install it using the exact same method as the playground [ref].
Once I have it the way I like it, I’ll poweroff the VM, and see to this image being replicated to all hypervisors.
ZFS Replication
Enter zrepl, a one-stop, integrated solution for ZFS replication. This tool is incredibly powerful, and can do snapshot management, sourcing / sinking replication, of course using incremental snapshots as they are native to ZFS. Because this is a LAB article, not a zrepl tutorial, I’ll just cut to the chase and show the configuration I came up with.
pim@hvn0-chbtl0:~$ cat << EOF | sudo tee /etc/zrepl/zrepl.yml
global:
  logging:
    # use syslog instead of stdout because it makes journald happy
    - type: syslog
      format: human
      level: warn

jobs:
- name: snap-vpp-proto
  type: snap
  filesystems:
    'ssd-vol0/vpp-proto-disk0<': true
  snapshotting:
    type: manual
  pruning:
    keep:
      - type: last_n
        count: 10

- name: source-vpp-proto
  type: source
  serve:
    type: stdinserver
    client_identities:
    - "hvn0-lab"
    - "hvn1-lab"
    - "hvn2-lab"
  filesystems:
    'ssd-vol0/vpp-proto-disk0<': true # all filesystems
  snapshotting:
    type: manual
EOF

pim@hvn0-chbtl0:~$ cat << EOF | sudo tee -a /root/.ssh/authorized_keys
# ZFS Replication Clients for IPng Networks LAB
command="zrepl stdinserver hvn0-lab",restrict ecdsa-sha2-nistp256 <omitted> root@hvn0.lab.ipng.ch
command="zrepl stdinserver hvn1-lab",restrict ecdsa-sha2-nistp256 <omitted> root@hvn1.lab.ipng.ch
command="zrepl stdinserver hvn2-lab",restrict ecdsa-sha2-nistp256 <omitted> root@hvn2.lab.ipng.ch
EOF
To unpack this, there are two jobs configured in zrepl:
snap-vpp-proto- the purpose of this job is to track snapshots as they are created. Normally, zrepl is configured to automatically make snapshots every hour and copy them out, but in my case, I only want to take snapshots when I changed and released thevpp-protoimage, not periodically. So, I set the snapshotting to manual, and let the system keep the last ten images.source-vpp-proto- this is a source job that uses a lazy (albeit fine in this lab environment) method to serve the snapshots to clients. By adding these SSH keys to the authorized_keys file, but restricting them to be able to execute only thezrepl stdinservercommand, and nothing else (ie. these keys cannot log in to the machine). If any given server were to present thesze keys, I can now map them to a zrepl client (for example,hvn0-labfor the SSH key presented by hostnamehvn0.lab.ipng.ch. The source job now knows to serve the listed filesystems (and their dataset children, noted by the<suffix), to those clients.
For the client side, each of the hypervisors gets only one job, called a pull job, which will periodically wake up (every
minute) and ensure that any pending snapshots and their incrementals from the remote source are slurped in and replicated
to a root_fs dataset, in this case I called it ssd-vol0/hvn0.chbtl0.ipng.ch so I can track where the datasets come from.
pim@hvn0-lab:~$ sudo ssh-keygen -t ecdsa -f /etc/zrepl/ssh/identity -C "root@$(hostname -f)"
pim@hvn0-lab:~$ cat << EOF | sudo tee /etc/zrepl/zrepl.yml
global:
  logging:
    # use syslog instead of stdout because it makes journald happy
    - type: syslog
      format: human
      level: warn

jobs:
- name: vpp-proto
  type: pull
  connect:
    type: ssh+stdinserver
    host: hvn0.chbtl0.ipng.ch
    user: root
    port: 22
    identity_file: /etc/zrepl/ssh/identity
  root_fs: ssd-vol0/hvn0.chbtl0.ipng.ch
  interval: 1m
  pruning:
    keep_sender:
      - type: regex
        regex: '.*'
    keep_receiver:
      - type: last_n
        count: 10
  recv:
    placeholder:
      encryption: off
After restarting zrepl for each of the machines (the source machine and the three pull machines), I can now do the following cool hat trick:
pim@hvn0-chbtl0:~$ virsh start --console vpp-proto
## Do whatever maintenance, and then poweroff the VM
pim@hvn0-chbtl0:~$ sudo zfs snapshot ssd-vol0/vpp-proto-disk0@20221019-release
pim@hvn0-chbtl0:~$ sudo zrepl signal wakeup source-vpp-proto
This signals the zrepl daemon to re-read the snapshots, which will pick up the newest one, and then without me doing much of anything else:
pim@hvn0-lab:~$ sudo zfs list -t all | grep vpp-proto
ssd-vol0/hvn0.chbtl0.ipng.ch/ssd-vol0/vpp-proto-disk0                   6.60G   367G     6.04G  -
ssd-vol0/hvn0.chbtl0.ipng.ch/ssd-vol0/vpp-proto-disk0@20221013-release   499M      -     6.04G  -
ssd-vol0/hvn0.chbtl0.ipng.ch/ssd-vol0/vpp-proto-disk0@20221018-release  24.1M      -     6.04G  -
ssd-vol0/hvn0.chbtl0.ipng.ch/ssd-vol0/vpp-proto-disk0@20221019-release     0B      -     6.04G  -
That last image was just pushed automatically to all hypervisors! If they’re turned off, no worries, as soon as they start up, their local zrepl will make its next minutely poll, and pull in all snapshots, bringing the machine up to date. So even when the hypervisors are normally turned off, this is zero-touch and maintenance free.
VM image maintenance
Now that I have a stable image to work off of, all I have to do is zfs clone this image into new per-VM datasets,
after which I can mess around on the VMs all I want, and when I’m done, I can zfs destroy the clone and bring it
back to normal. However, I clearly don’t want one and the same clone for each of the VMs, as they do have lots of
config files that are specific to that one instance. For example, the mgmt IPv4/IPv6 addresses are unique, and
the VPP and Bird/FRR configs are unique as well. But how unique are they, really?
Enter Jinja (known mostly from Ansible). I decide to make some form of per-VM config files that are generated based
on some templates. That way, I can clone the base ZFS dataset, copy in the deltas, and boot that instead. And to
be extra efficient, I can also make a per-VM zfs snapshot of the cloned+updated filesystem, before tinkering with
the VMs, which I’ll call a pristine snapshot. Still with me?
- First, clone the base dataset into a per-VM dataset, say
ssd-vol0/vpp0-0 - Then, generate a bunch of override files, copying them into the per-VM dataset
ssd-vol0/vpp0-0 - Finally, create a snapshot of that, called
ssd-vol0/vpp0-0@pristineand boot off of that.
Now, returning the VM to a pristine state is simply a matter of shutting down the VM, performing a zfs rollback
to the pristine snapshot, and starting the VM again. Ready? Let’s go!
Generator
So off I go, writing a small Python generator that uses Jinja to read a bunch of YAML files, merging them along the way, and then traversing a set of directories with template files and per-VM overrides, to assemble a build output directory with a fully formed set of files that I can copy into the per-VM dataset.
Take a look at this as a minimally viable configuration:
pim@lab:~/src/lab$ cat config/common/generic.yaml
overlays:
  default:
    path: overlays/bird/
    build: build/default/
lab:
  mgmt:
    ipv4: 192.168.1.80/24
    ipv6: 2001:678:d78:101::80/64
    gw4: 192.168.1.252
    gw6: 2001:678:d78:101::1
  nameserver:
    search: [ "lab.ipng.ch", "ipng.ch", "rfc1918.ipng.nl", "ipng.nl" ]
  nodes: 4

pim@lab:~/src/lab$ cat config/hvn0.lab.ipng.ch.yaml
lab:
  id: 0
  ipv4: 192.168.10.0/24
  ipv6: 2001:678:d78:200::/60
  nameserver:
    addresses: [ 192.168.10.4, 2001:678:d78:201::ffff ]
  hypervisor: hvn0.lab.ipng.ch
Here I define a common config file with fields and attributes which will apply to all LAB environments, things
such as the mgmt network, nameserver search paths, and how many VPP virtual machine nodes I want to build. Then,
for hvn0.lab.ipng.ch, I specify an IPv4 and IPv6 prefix assigned to it, some specific nameserver endpoints
that will point at an unbound running on lab.ipng.ch itself.
I can now create any file I’d like which may use variable substition and other jinja2 style templating. Take for example these two files:
pim@lab:~/src/lab$ cat overlays/bird/common/etc/netplan/01-netcfg.yaml.j2
network:
  version: 2
  renderer: networkd
  ethernets:
    enp1s0:
      optional: true
      accept-ra: false
      dhcp4: false
      addresses: [ {{node.mgmt.ipv4}}, {{node.mgmt.ipv6}} ]
      gateway4: {{lab.mgmt.gw4}}
      gateway6: {{lab.mgmt.gw6}}

pim@lab:~/src/lab$ cat overlays/bird/common/etc/netns/dataplane/resolv.conf.j2
domain lab.ipng.ch
search{% for domain in lab.nameserver.search %} {{domain}}{%endfor %}

{% for resolver in lab.nameserver.addresses %}
nameserver {{resolver}}
{%endfor%}
The first file is a [NetPlan.io] configuration that substitutes the correct management
IPv4 and IPv6 addresses and gateways. The second one enumerates a set of search domains and nameservers, so that
each LAB can have their own unique resolvers. I point these at the lab.ipng.ch uplink interface, in the case
of the LAB hvn0.lab.ipng.ch, this will be 192.168.10.4 and 2001:678:d78:201::ffff, but on hvn1.lab.ipng.ch
I can override that to become 192.168.11.4 and 2001:678:d78:211::ffff.
There’s one subdirectory for each overlay type (imagine that I want a lab that runs Bird2, but I may also want one which runs FRR, or another thing still). Within the overlay directory, there’s one common tree, with files that apply to every machine in the LAB, and a hostname tree, with files that apply only to specific nodes (VMs) in the LAB:
pim@lab:~/src/lab$ tree overlays/default/
overlays/default/
├── common
│   ├── etc
│   │   ├── bird
│   │   │   ├── bfd.conf.j2
│   │   │   ├── bird.conf.j2
│   │   │   ├── ibgp.conf.j2
│   │   │   ├── ospf.conf.j2
│   │   │   └── static.conf.j2
│   │   ├── hostname.j2
│   │   ├── hosts.j2
│   │   ├── netns
│   │   │   └── dataplane
│   │   │       └── resolv.conf.j2
│   │   ├── netplan
│   │   │   └── 01-netcfg.yaml.j2
│   │   ├── resolv.conf.j2
│   │   └── vpp
│   │       ├── bootstrap.vpp.j2
│   │       └── config
│   │           ├── defaults.vpp
│   │           ├── flowprobe.vpp.j2
│   │           ├── interface.vpp.j2
│   │           ├── lcp.vpp
│   │           ├── loopback.vpp.j2
│   │           └── manual.vpp.j2
│   ├── home
│   │   └── ipng
│   └── root
├── hostname
    ├── vpp0-0
        └── etc
(etc)       └── vpp
                └── config
                    └── interface.vpp
Now all that’s left to do is generate this hierarchy, and of course I can check this in to git and track changes to the templates and their resulting generated filesystem overrides over time:
pim@lab:~/src/lab$ ./generate -q --host hvn0.lab.ipng.ch
pim@lab:~/src/lab$ find build/default/hvn0.lab.ipng.ch/vpp0-0/ -type f
build/default/hvn0.lab.ipng.ch/vpp0-0/home/ipng/.ssh/authorized_keys
build/default/hvn0.lab.ipng.ch/vpp0-0/etc/hosts
build/default/hvn0.lab.ipng.ch/vpp0-0/etc/resolv.conf
build/default/hvn0.lab.ipng.ch/vpp0-0/etc/bird/static.conf
build/default/hvn0.lab.ipng.ch/vpp0-0/etc/bird/bfd.conf
build/default/hvn0.lab.ipng.ch/vpp0-0/etc/bird/bird.conf
build/default/hvn0.lab.ipng.ch/vpp0-0/etc/bird/ibgp.conf
build/default/hvn0.lab.ipng.ch/vpp0-0/etc/bird/ospf.conf
build/default/hvn0.lab.ipng.ch/vpp0-0/etc/vpp/config/loopback.vpp
build/default/hvn0.lab.ipng.ch/vpp0-0/etc/vpp/config/flowprobe.vpp
build/default/hvn0.lab.ipng.ch/vpp0-0/etc/vpp/config/interface.vpp
build/default/hvn0.lab.ipng.ch/vpp0-0/etc/vpp/config/defaults.vpp
build/default/hvn0.lab.ipng.ch/vpp0-0/etc/vpp/config/lcp.vpp
build/default/hvn0.lab.ipng.ch/vpp0-0/etc/vpp/config/manual.vpp
build/default/hvn0.lab.ipng.ch/vpp0-0/etc/vpp/bootstrap.vpp
build/default/hvn0.lab.ipng.ch/vpp0-0/etc/netplan/01-netcfg.yaml
build/default/hvn0.lab.ipng.ch/vpp0-0/etc/netns/dataplane/resolv.conf
build/default/hvn0.lab.ipng.ch/vpp0-0/etc/hostname
build/default/hvn0.lab.ipng.ch/vpp0-0/root/.ssh/authorized_keys
Open vSwitch maintenance
The OVS installs on each Debian hypervisor in the lab is the same. I install the required Debian packages, create a switchfabric, add one physical network port (the one that will serve as the uplink (VLAN 10 in the sketch above) for the LAB), and all the virtio ports from KVM.
pim@hvn0-lab:~$ sudo vi /etc/netplan/01-netcfg.yaml
network:
  vlans:
    uplink:
      optional: true
      accept-ra: false
      dhcp4: false
      link: eno1
      id: 200
pim@hvn0-lab:~$ sudo netplan apply
pim@hvn0-lab:~$ sudo apt install openvswitch-switch python3-openvswitch
pim@hvn0-lab:~$ sudo ovs-vsctl add-br vpplan
pim@hvn0-lab:~$ sudo ovs-vsctl add-port vpplan uplink tag=10
The vpplan switch fabric and its uplink port will persist across reboots. Then I add a small change to libvirt
defined virtual machines:
pim@hvn0-lab:~$ virsh edit vpp0-0
...
    <interface type='bridge'>
      <mac address='52:54:00:00:10:00'/>
      <source bridge='vpplan'/>
      <virtualport type='openvswitch' />
      <target dev='vpp0-0-0'/>
      <model type='virtio'/>
      <mtu size='9216'/>
      <address type='pci' domain='0x0000' bus='0x10' slot='0x00' function='0x0' multifunction='on'/>
    </interface>
    <interface type='bridge'>
      <mac address='52:54:00:00:10:01'/>
      <source bridge='vpplan'/>
      <virtualport type='openvswitch' />
      <target dev='vpp0-0-1'/>
      <model type='virtio'/>
      <mtu size='9216'/>
      <address type='pci' domain='0x0000' bus='0x10' slot='0x00' function='0x1'/>
    </interface>
... etc
That the only two things I need to do are ensure that the source bridge will be called the same as
the OVS fabric, in my case vpplan, and the virtualport type is openvswitch, and that’s it!
Once all four vpp0-* virtual machines each have all four of their network cards updated, when they
boot, the hypervisor will add them each as new untagged ports in the OVS fabric.
To then build the topology that I have in mind for the LAB, where each VPP machine is daisychained to its siblin, all we have to do is program that into the OVS configuration:
pim@hvn0-lab:~$ cat << EOF > ovs-config.sh
#!/bin/sh
#
# OVS configuration for the `default` overlay

LAB=${LAB:=0}
for node in 0 1 2 3; do
  for int in 0 1 2 3; do
    ovs-vsctl set port vpp${LAB}-${node}-${int} vlan_mode=native-untagged
  done
done

# Uplink is VLAN 10
ovs-vsctl add port vpp${LAB}-0-0 tag 10
ovs-vsctl add port uplink tag 10

# Link vpp${LAB}-0 <-> vpp${LAB}-1 in VLAN 20
ovs-vsctl add port vpp${LAB}-0-1 tag 20
ovs-vsctl add port vpp${LAB}-1-0 tag 20

# Link vpp${LAB}-1 <-> vpp${LAB}-2 in VLAN 21
ovs-vsctl add port vpp${LAB}-1-1 tag 21
ovs-vsctl add port vpp${LAB}-2-0 tag 21

# Link vpp${LAB}-2 <-> vpp${LAB}-3 in VLAN 22
ovs-vsctl add port vpp${LAB}-2-1 tag 22
ovs-vsctl add port vpp${LAB}-3-0 tag 22
EOF

pim@hvn0-lab:~$ chmod 755 ovs-config.sh
pim@hvn0-lab:~$ sudo ./ovs-config.sh
The first block here wheels over all nodes and then for all of ther ports, sets the VLAN mode to what
OVS calleds ‘native-untagged’. In this mode, the tag becomes the VLAN in which the port will operate,
but, to add as well dot1q tagged additional VLANs, we can use the syntax add port ... trunks 10,20,30.
TO see the configuration, ovs-vsctl show port vpp0-0-0 will show the switch port configuration, while
ovs-vsctl show interface vpp0-0-0 will show the virtual machine’s NIC configuration (think of the
difference here as the switch port on the one hand, and the NIC (interface) plugged into it on the other).
Deployment
There’s three main points to consider when deploying these lab VMs:
- Create the VMs and their ZFS datasets
- Destroy the VMs and their ZFS datasets
- Bring the VMs into a pristine state
Create
If the hypervisor doesn’t yet have a LAB running, we need to create it:
BASE=${BASE:=ssd-vol0/hvn0.chbtl0.ipng.ch/ssd-vol0/vpp-proto-disk0@20221019-release}
BUILD=${BUILD:=default}
LAB=${LAB:=0}

## Do not touch below this line
LABDIR=/var/lab
STAGING=$LABDIR/staging
HVN="hvn${LAB}.lab.ipng.ch"

echo "*  Cloning base"
ssh root@$HVN "set -x; for node in 0 1 2 3; do VM=vpp${LAB}-\${node}; \
  mkdir -p $STAGING/\$VM; zfs clone $BASE ssd-vol0/\$VM; done"
sleep 1

echo "*  Mounting in staging"
ssh root@$HVN "set -x; for node in 0 1 2 3; do VM=vpp${LAB}-\${node}; \
  mount /dev/zvol/ssd-vol0/\$VM-part1 $STAGING/\$VM; done"

echo "*  Rsyncing build"
rsync -avugP build/$BUILD/$HVN/ root@hvn${LAB}.lab.ipng.ch:$STAGING

echo "*  Setting permissions"
ssh root@$HVN "set -x; for node in 0 1 2 3; do VM=vpp${LAB}-\${node}; \
  chown -R root. $STAGING/\$VM/root; done"

echo "*  Unmounting and snapshotting pristine state"
ssh root@$HVN "set -x; for node in 0 1 2 3; do VM=vpp${LAB}-\${node}; \
  umount $STAGING/\$VM; zfs snapshot ssd-vol0/\${VM}@pristine; done"

echo "*  Starting VMs"
ssh root@$HVN "set -x; for node in 0 1 2 3; do VM=vpp${LAB}-\${node}; \
  virsh start \$VM; done"

echo "*  Committing OVS config"
scp overlays/$BUILD/ovs-config.sh root@$HVN:$LABDIR
ssh root@$HVN "set -x; LAB=$LAB $LABDIR/ovs-config.sh"
After running this, the hypervisor will have 4 clones, and 4 snapshots (one for each virtual machine):
root@hvn0-lab:~# zfs list -t all
NAME                                                                     USED  AVAIL     REFER  MOUNTPOINT
ssd-vol0                                                                6.80G   367G       24K  /ssd-vol0
ssd-vol0/hvn0.chbtl0.ipng.ch                                            6.60G   367G       24K  none
ssd-vol0/hvn0.chbtl0.ipng.ch/ssd-vol0                                   6.60G   367G       24K  none
ssd-vol0/hvn0.chbtl0.ipng.ch/ssd-vol0/vpp-proto-disk0                   6.60G   367G     6.04G  -
ssd-vol0/hvn0.chbtl0.ipng.ch/ssd-vol0/vpp-proto-disk0@20221013-release   499M      -     6.04G  -
ssd-vol0/hvn0.chbtl0.ipng.ch/ssd-vol0/vpp-proto-disk0@20221018-release  24.1M      -     6.04G  -
ssd-vol0/hvn0.chbtl0.ipng.ch/ssd-vol0/vpp-proto-disk0@20221019-release     0B      -     6.04G  -
ssd-vol0/vpp0-0                                                         43.6M   367G     6.04G  -
ssd-vol0/vpp0-0@pristine                                                1.13M      -     6.04G  -
ssd-vol0/vpp0-1                                                         25.0M   367G     6.04G  -
ssd-vol0/vpp0-1@pristine                                                1.14M      -     6.04G  -
ssd-vol0/vpp0-2                                                         42.2M   367G     6.04G  -
ssd-vol0/vpp0-2@pristine                                                1.13M      -     6.04G  -
ssd-vol0/vpp0-3                                                         79.1M   367G     6.04G  -
ssd-vol0/vpp0-3@pristine                                                1.13M      -     6.04G  -
The last thing the create script does is commit the OVS configuration, because when the VMs are shutdown or newly created, KVM will add them to the switching fabric as untagged/unconfigured ports.
But would you look at that! The delta between the base image and the pristine snapshots is about 1MB of
configuration files, the ones that I generated and rsync’d in above, and then once the machine boots, it
will have a read/write mounted filesystem as per normal, except it’s a delta on top of the snapshotted,
cloned dataset.
Destroy
I love destroying things! But in this case, I’m removing what are essentially ephemeral disk images, as I still have the base image to clone from. But, the destroy is conceptually very simple:
BASE=${BASE:=ssd-vol0/hvn0.chbtl0.ipng.ch/ssd-vol0/vpp-proto-disk0@20221018-release}
LAB=${LAB:=0}

## Do not touch below this line
HVN="hvn${LAB}.lab.ipng.ch"

echo "*  Destroying VMs"
ssh root@$HVN "set -x; for node in 0 1 2 3; do VM=vpp${LAB}-\${node}; \
  virsh destroy \$VM; done"

echo "*  Destroying ZFS datasets"
ssh root@$HVN "set -x; for node in 0 1 2 3; do VM=vpp${LAB}-\${node}; \
  zfs destroy -r ssd-vol0/\$VM; done"
After running this, the VMs will be shutdown and their cloned filesystems (including any snapshots
those may have) are wiped. To get back into a working state, all I must do is run ./create again!
Pristine
Sometimes though, I don’t need to completely destroy the VMs, but rather I want to put them back into
the state they where just after creating the LAB. Luckily, the create made a snapshot (called pristine)
for each VM before booting it, so bringing the LAB back to factory default settings is really easy:
BUILD=${BUILD:=default}
LAB=${LAB:=0}

## Do not touch below this line
LABDIR=/var/lab
STAGING=$LABDIR/staging
HVN="hvn${LAB}.lab.ipng.ch"

## Bring back into pristine state
echo "*  Restarting VMs from pristine snapshot"
ssh root@$HVN "set -x; for node in 0 1 2 3; do VM=vpp${LAB}-\${node}; \
  virsh destroy \$VM;
  zfs rollback ssd-vol0/\${VM}@pristine;
  virsh start \$VM; done"

echo "*  Committing OVS config"
scp overlays/$BUILD/ovs-config.sh root@$HVN:$LABDIR
ssh root@$HVN "set -x; $LABDIR/ovs-config.sh"
Results
After completing this project, I have a completely hands-off, automated and autogenerated, and very maneageable set of three LABs, each booting up in a running OSPF/OSPFv3 enabled topology for IPv4 and IPv6:
pim@lab:~/src/lab$ traceroute -q1 vpp0-3
traceroute to vpp0-3 (192.168.10.3), 30 hops max, 60 byte packets
 1  e0.vpp0-0.lab.ipng.ch (192.168.10.5)  1.752 ms
 2  e0.vpp0-1.lab.ipng.ch (192.168.10.7)  4.064 ms
 3  e0.vpp0-2.lab.ipng.ch (192.168.10.9)  5.178 ms
 4  vpp0-3.lab.ipng.ch (192.168.10.3)  7.469 ms
pim@lab:~/src/lab$ ssh ipng@vpp0-3

ipng@vpp0-3:~$ traceroute6 -q1  vpp2-3
traceroute to vpp2-3 (2001:678:d78:220::3), 30 hops max, 80 byte packets
 1  e1.vpp0-2.lab.ipng.ch (2001:678:d78:201::3:2)  2.088 ms
 2  e1.vpp0-1.lab.ipng.ch (2001:678:d78:201::2:1)  6.958 ms
 3  e1.vpp0-0.lab.ipng.ch (2001:678:d78:201::1:0)  8.841 ms
 4  lab0.lab.ipng.ch (2001:678:d78:201::ffff)  7.381 ms
 5  e0.vpp2-0.lab.ipng.ch (2001:678:d78:221::fffe)  8.304 ms
 6  e0.vpp2-1.lab.ipng.ch (2001:678:d78:221::1:21)  11.633 ms
 7  e0.vpp2-2.lab.ipng.ch (2001:678:d78:221::2:22)  13.704 ms
 8  vpp2-3.lab.ipng.ch (2001:678:d78:220::3)  15.597 ms
If you read this far, thanks! Each of these three LABs come with 4x10Gbit DPDK based packet generators (Cisco T-Rex), four VPP machines running either Bird2 or FRR, and together they are connected to a 100G capable switch.
These LABs are for rent, and we offer hands-on training on them. Please contact us for daily/weekly rates, and custom training sessions.
I checked the generator and deploy scripts in to a git repository, which I’m happy to share if there’s an interest. But because it contains a few implementation details and doesn’t do a lot of fool-proofing, as well as because most of this can be easily recreated by interested parties from this blogpost, I decided not to publish the LAB project github, but on our private git.ipng.ch server instead. Mail us if you’d like to take a closer look, I’m happy to share the code.