Pixelfed - Part 1 - Installing
About this series
![]()
I have seen companies achieve great successes in the space of consumer internet and entertainment industry. I’ve been feeling less enthusiastic about the stronghold that these corporations have over my digital presence. I am the first to admit that using “free” services is convenient, but these companies are sometimes taking away my autonomy and exerting control over society. To each their own of course, but for me it’s time to take back a little bit of responsibility for my online social presence, away from centrally hosted services and to privately operated ones.
After having written a fair bit about my Mastodon [install] and [monitoring], I’ve been using it every day. This morning, my buddy Ramón asked if he could make a second account on ublog.tech for his Campervan Adventures, and notably to post pics of where he and his family went.
But if pics is your jam, why not … [Pixelfed]!
Introduction
Similar to how blogging is the act of publishing updates to a website, microblogging is the act of publishing small updates to a stream of updates on your profile. Very similar to the relationship between Facebook and Instagram, Mastodon and Pixelfed give the ability to post and share, cross-link, discuss, comment and like, across the entire Fediverse. Except, Pixelfed doesn’t do this in a centralized way, and I get to be a steward of my own data.
As is common in the Fediverse, groups of people congregate on a given server, of which they become a user by creating an account on that server. Then, they interact with one another on that server, but users can also interact with folks on other servers. Instead of following @IPngNetworks, they might follow a user on a given server domain, like @IPngNetworks@pix.ublog.tech. This way, all these servers can be run independently but interact with each other using a common protocol (called ActivityPub). I’ve heard this concept be compared to choosing an e-mail provider: I might choose Google’s gmail.com, and you might use Microsoft’s live.com. However we can send e-mails back and forth due to this common protocol (called SMTP).
pix.uBlog.tech
I thought I would give it a go, mostly out of engineering curiosity but also because I more strongly feel today that we (the users) ought to take a bit more ownership back. I’ve been a regular blogging and micro-blogging user since approximately for ever, and I think it may be a good investment of my time to learn a bit more about the architecture of Pixelfed. So, I’ve decided to build and productionize a server instance.
Previously, I registered uBlog.tech and have been running that for about a year as a Mastodon instance. Incidentally, if you’re reading this and would like to participate, the server welcomes users in the network-, systems- and software engineering disciplines. But, before I can get to the fun parts though, I have to do a bunch of work to get this server in a shape in which it can be trusted with user generated content.
The IPng environment
Pixelfed: Virtual Machine
I provision a VM with 8vCPUs (dedicated on the underlying hypervisor), including 16GB of memory and one virtio network card. For disks, I
will use two block devices, one small one of 16GB (vda) that is created on the hypervisor’s ssd-vol1/libvirt/pixelfed-disk0, to be used only
for boot, logs and OS. Then, a second one (vdb) is created at 2TB on vol0/pixelfed-disk1 and it will be used for Pixelfed itself.
I simply install Debian into vda using virt-install. At IPng Networks we have some ansible-style automation that takes over the
machine, and further installs all sorts of Debian packages that we use (like a Prometheus node exporter, more on that later), and sets up a
firewall that allows SSH access for our trusted networks, and otherwise only allows port 80 because this is to be a (backend) webserver
behind the NGINX cluster.
After installing Debian Bullseye, I’ll create the following ZFS filesystems on vdb:
pim@pixelfed:~$ sudo zpool create data /dev/vdb
pim@pixelfed:~$ sudo zfs create -o data/pixelfed -V10G
pim@pixelfed:~$ sudo zfs create -o mountpoint=/data/pixelfed/pixelfed/storage data/pixelfed-storage
pim@pixelfed:~$ sudo zfs create -o mountpoint=/var/lib/mysql data/mysql -V20G
pim@pixelfed:~$ sudo zfs create -o mountpoint=/var/lib/redis data/redis -V2G
As a sidenote, I realize that this ZFS filesystem pool consists only of vdb, but its underlying blockdevice is protected in a raidz, and
it is copied incrementally daily off-site by the hypervisor. I’m pretty confident on safety here, but I prefer to use ZFS for the virtual
machine guests as well, because now I can do local snapshotting, of say data/pixelfed, and I can more easily grow/shrink the
datasets for the supporting services, as well as isolate them individually against sibling wildgrowth.
The VM gets one virtual NIC, which will connect to the [IPng Site Local] network using
jumboframes. This way, the machine itself is disconnected from the internet, saving a few IPv4 addresses and allowing for the IPng NGINX
frontends to expose it. I give it the name pixelfed.net.ipng.ch with addresses 198.19.4.141 and 2001:678:d78:507::d, which will be
firewalled and NATed via the IPng SL gateways.
IPng Frontend: Wildcard SSL
I run most websites behind a cluster of NGINX webservers, which are carrying an SSL certificate which support wildcards. The system is using [DNS-01] challenges, so the first order of business is to expand the certificate from serving only [ublog.tech] (which is in use by the companion Mastodon instance), to include as well *.ublog.tech so that I can add the new Pixelfed instance as [pix.ublog.tech]:
lego@lego:~$ certbot certonly --config-dir /home/lego/acme-dns --logs-dir /home/lego/logs \
  --work-dir /home/lego/workdir --manual \
  --manual-auth-hook /home/lego/acme-dns/acme-dns-auth.py \
  --preferred-challenges dns --debug-challenges \
  -d ipng.ch -d *.ipng.ch -d *.net.ipng.ch \
  -d ipng.nl -d *.ipng.nl \
  -d ipng.eu -d *.ipng.eu \
  -d ipng.li -d *.ipng.li \
  -d ublog.tech -d *.ublog.tech \
  -d as8298.net \
  -d as50869.net

CERTFILE=/home/lego/acme-dns/live/ipng.ch/fullchain.pem
KEYFILE=/home/lego/acme-dns/live/ipng.ch/privkey.pem
MACHS="nginx0.chrma0.ipng.ch nginx0.chplo0.ipng.ch nginx0.nlams1.ipng.ch nginx0.nlams2.ipng.ch"

for MACH in $MACHS; do
  fping -q $MACH 2>/dev/null || {
    echo "$MACH: Skipping (unreachable)"
    continue
  }
  echo $MACH: Copying $CERT
  scp -q $CERTFILE $MACH:/etc/nginx/certs/$CERT.crt
  scp -q $KEYFILE $MACH:/etc/nginx/certs/$CERT.key
  echo $MACH: Reloading nginx
  ssh $MACH 'sudo systemctl reload nginx'
done
The first command here requests a certificate with certbot, and note the addition of the flag -d *.ublog.tech. It’ll correctly say that
there are 11 existing domains in this certificate, and ask me if I’d like to request a new cert with the 12th one added. I answer yes, and
a few seconds later, acme-dns has answered all of Let’s Encrypt’s challenges, and issues a certificate.
The second command then distributes that certificate to the four NGINX frontends, and reloads the cert. Now, I can use the hostname
pix.ublog.tech, as far as the SSL certs are concerned. Of course, the regular certbot cronjob renews the cert regularly, so I tucked away
the second part here into a script called bin/certbot-distribute, using the RENEWED_LINEAGE variable that certbot(1) sets when using the
flag --deploy-hook:
lego@lego:~$ cat /etc/cron.d/certbot
SHELL=/bin/sh
PATH=/usr/local/sbin:/usr/local/bin:/sbin:/bin:/usr/sbin:/usr/bin

0 */12 * * * lego perl -e 'sleep int(rand(43200))' && \
                  certbot -q renew --config-dir /home/lego/acme-dns \
                          --logs-dir /home/lego/logs --work-dir /home/lego/workdir \
                          --deploy-hook "/home/lego/bin/certbot-distribute"
IPng Frontend: NGINX
The previous certbot-distribute shell script has copied the certificate to four separate NGINX instances, two in Amsterdam hosted at
AS8283 (Coloclue), one in Zurich hosted at AS25091 (IP-Max), and one in Geneva hosted at AS8298 (IPng Networks). Each of these NGINX servers
has a frontend IPv4 and IPv6 address, and a backend jumboframe enabled interface in IPng Site Local (198.19.0.0/16). Because updating the
configuration on four production machines is cumbersome, I previously created an Ansible playbook, which I now add this new site to:
pim@squanchy:~/src/ipng-ansible$ cat roles/nginx/files/sites-available/pix.ublog.tech.conf
server {
  listen [::]:80;
  listen 0.0.0.0:80;

  server_name pix.ublog.tech;
  access_log /var/log/nginx/pix.ublog.tech-access.log;
  include /etc/nginx/conf.d/ipng-headers.inc;

  include "conf.d/lego.inc";

  location / {
    return 301 https://$host$request_uri;
  }
}

server {
  listen [::]:443 ssl http2;
  listen 0.0.0.0:443 ssl http2;
  ssl_certificate /etc/nginx/certs/ipng.ch.crt;
  ssl_certificate_key /etc/nginx/certs/ipng.ch.key;
  include /etc/nginx/conf.d/options-ssl-nginx.inc;
  ssl_dhparam /etc/nginx/conf.d/ssl-dhparams.inc;

  server_name pix.ublog.tech;
  access_log /var/log/nginx/pix.ublog.tech-access.log upstream;
  include /etc/nginx/conf.d/ipng-headers.inc;

  keepalive_timeout    70;
  sendfile             on;
  client_max_body_size 80m;

  location / {
    proxy_pass http://pixelfed.net.ipng.ch:80;
    proxy_set_header Host $host;
    proxy_set_header X-Forwarded-Proto $scheme;
    proxy_set_header X-Real-IP $remote_addr;
    proxy_set_header X-Forwarded-For $proxy_add_x_forwarded_for;
  }
}
The configuration is very straight forward. The first server block bounces all traffic destined to port 80 towards its port 443 equivalent.
The second server block (listening on port 443) contains the certificate I just renewed serve for *.ublog.tech which allows the cluster to
offload SSL and forward the traffic on the internal private network on to the VM I created earlier.
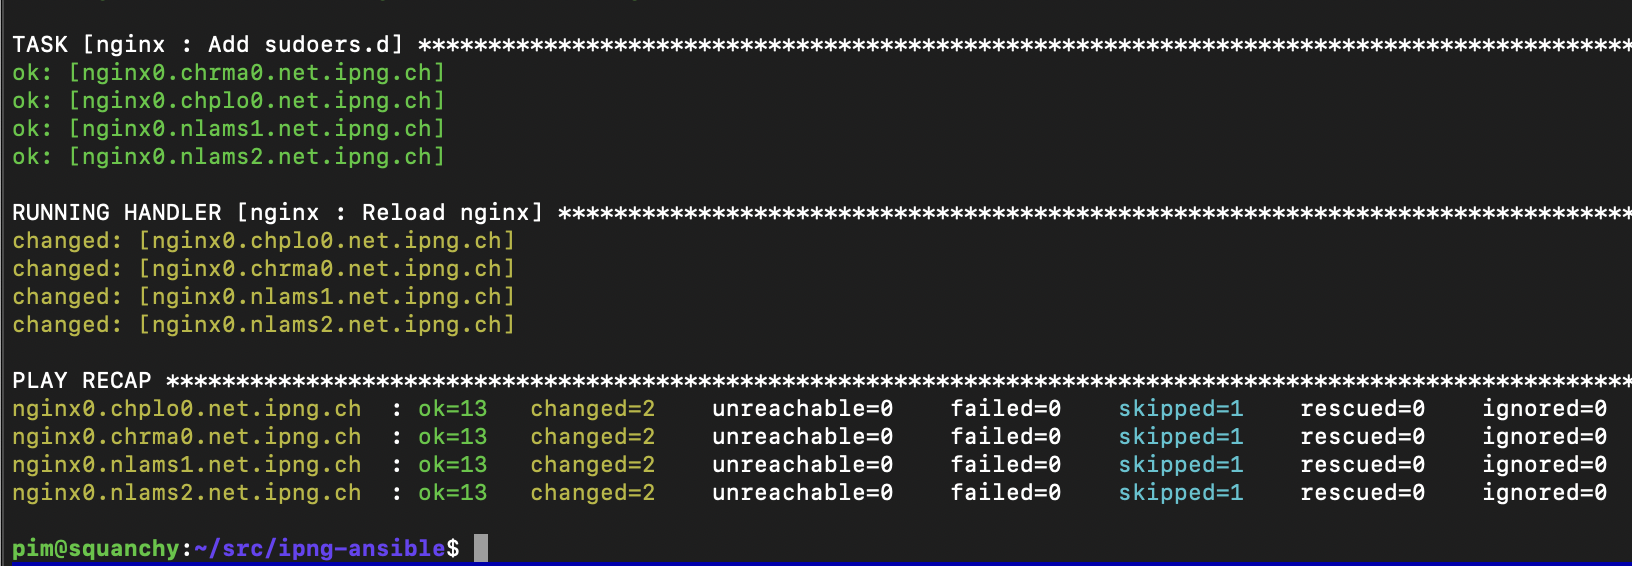
One quick Ansible playbook run later, and the reversed proxies are ready to rock and roll:
Of course, this website will just timeout for the time being, because there’s nothing listening (yet) on pixelfed.net.ipng.ch:80.
Installing Pixelfed
So off I go, installing Pixelfed on the new Debian VM. First, I’ll install the set of Debian packages this instance will need, including PHP 8.1 (which is the minimum supported, according to the Pixelfed docs):
pim@pixelfed:~$ sudo apt install apt-transport-https lsb-release ca-certificates git wget curl \
  build-essential apache2 mariadb-server pngquant optipng jpegoptim gifsicle ffmpeg redis
pim@pixelfed:~$ sudo wget -O /etc/apt/trusted.gpg.d/php.gpg https://packages.sury.org/php/apt.gpg
pim@pixelfed:~$ echo "deb https://packages.sury.org/php/ $(lsb_release -sc) main" \
  | sudo tee -a /etc/apt/sources.list.d/php.list
pim@pixelfed:~$ apt update
pim@pixelfed:~$ apt-get install php8.1-fpm php8.1 php8.1-common php8.1-cli php8.1-gd \
  php8.1-mbstring php8.1-xml php8.1-bcmath php8.1-pgsql php8.1-curl php8.1-xml php8.1-xmlrpc \
  php8.1-imagick php8.1-gd php8.1-mysql php8.1-cli php8.1-intl php8.1-zip php8.1-redis
After all those bits and bytes settle on the filesystem, I simply follow the regular [install guide] from the upstream documentation.
I update the PHP config to allow larger uploads:
pim@pixelfed:~$ sudo vim /etc/php/8.1/fpm/php.ini
upload_max_filesize = 100M
post_max_size = 100M
I create a FastCGI pool for Pixelfed:
pim@pixelfed:~$ cat << EOF | sudo tee /etc/php/8.1/fpm/pool.d/pixelfed.conf
[pixelfed]
user = pixelfed
group = pixelfed
listen.owner = www-data
listen.group = www-data
listen.mode = 0660
listen = /var/run/php.pixelfed.sock
pm = dynamic
pm.max_children = 20
pm.start_servers = 5
pm.min_spare_servers = 5
pm.max_spare_servers = 20
chdir = /data/pixelfed
php_flag[display_errors] = on
php_admin_value[error_log] = /data/pixelfed/php.error.log
php_admin_flag[log_errors] = on
php_admin_value[open_basedir] = /data/pixelfed:/usr/share/:/tmp:/var/lib/php
EOF
I reference this pool in a simple non-SSL Apache config, after enabling the modules that Pixelfed needs:
pim@pixelfed:~$ cat << EOF | sudo tee /etc/apache2/sites-available/pixelfed.conf
<VirtualHost *:80>
    ServerName pix.ublog.tech
    ServerAdmin pixelfed@ublog.tech

    DocumentRoot /data/pixelfed/pixelfed/public
    LogLevel debug
    <Directory /data/pixelfed/pixelfed/public>
        Options Indexes FollowSymLinks
        AllowOverride All
        Require all granted
    </Directory>

    ErrorLog ${APACHE_LOG_DIR}/pixelfed.error.log
    CustomLog ${APACHE_LOG_DIR}/pixelfed.access.log combined
    <FilesMatch \.php$>
        SetHandler "proxy:unix:/var/run/php.pixelfed.sock|fcgi://localhost"
    </FilesMatch>
</VirtualHost>
EOF
I create a user and database, and finally download the Pixelfed sourcecode and install the composer tool:
pim@pixelfed:~$ sudo useradd pixelfed -m -d /data/pixelfed -s /bin/bash -r -c "Pixelfed User"
pim@pixelfed:~$ sudo mysql
CREATE DATABASE pixelfed;
GRANT ALL ON pixelfed.* TO pixelfed@localhost IDENTIFIED BY '<redacted>';
exit

pim@pixelfed:~$ wget -O composer-setup.php https://getcomposer.org/installer
pim@pixelfed:~$ sudo php composer-setup.php
pim@pixelfed:~$ sudo cp composer.phar /usr/local/bin/composer
pim@pixelfed:~$ rm composer-setup.php

pim@pixelfed:~$ sudo su pixelfed
pixelfed@pixelfed:~$ git clone -b dev https://github.com/pixelfed/pixelfed.git pixelfed
pixelfed@pixelfed:~$ cd pixelfed
pixelfed@pixelfed:/data/pixelfed/pixelfed$ composer install --no-ansi --no-interaction --optimize-autoloader
pixelfed@pixelfed:/data/pixelfed/pixelfed$ composer update
With the basic installation of pacakges and dependencies all squared away, I’m ready to configure the instance:
pixelfed@pixelfed:/data/pixelfed/pixelfed$ vim .env
APP_NAME="uBlog Pixelfed"
APP_URL="https://pix.ublog.tech"
APP_DOMAIN="pix.ublog.tech"
ADMIN_DOMAIN="pix.ublog.tech"
SESSION_DOMAIN="pix.ublog.tech"
TRUST_PROXIES="*"

# Database Configuration
DB_CONNECTION="mysql"
DB_HOST="127.0.0.1"
DB_PORT="3306"
DB_DATABASE="pixelfed"
DB_USERNAME="pixelfed"
DB_PASSWORD="<redacted>"
MAIL_DRIVER=smtp
MAIL_HOST=localhost
MAIL_PORT=25
MAIL_FROM_ADDRESS="pixelfed@ublog.tech"
MAIL_FROM_NAME="uBlog Pixelfed"

pixelfed@pixelfed:/data/pixelfed/pixelfed$ php artisan key:generate
pixelfed@pixelfed:/data/pixelfed/pixelfed$ php artisan storage:link
pixelfed@pixelfed:/data/pixelfed/pixelfed$ php artisan migrate --force
pixelfed@pixelfed:/data/pixelfed/pixelfed$ php artisan import:cities
pixelfed@pixelfed:/data/pixelfed/pixelfed$ php artisan instance:actor
pixelfed@pixelfed:/data/pixelfed/pixelfed$ php artisan passport:keys
pixelfed@pixelfed:/data/pixelfed/pixelfed$ php artisan route:cache
pixelfed@pixelfed:/data/pixelfed/pixelfed$ php artisan view:cache
pixelfed@pixelfed:/data/pixelfed/pixelfed$ php artisan config:cache
Pixelfed is based on [Laravel], a PHP framework for Web Artisans (which I guess now that I run both LibreNMS, IXPManager and Pixelfed, makes me one too?). Laravel has two runner types commonly used. One is task queuing via a module called Laravel Horizon, which uses Redis to store work items to be consumed by task workers:
pim@pixelfed:~$ cat << EOF | sudo tee /lib/systemd/system/pixelfed.service
[Unit]
Description=Pixelfed task queueing via Laravel Horizon
After=network.target
Requires=mariadb
Requires=php-fpm
Requires=redis
Requires=apache

[Service]
Type=simple
ExecStart=/usr/bin/php /data/pixelfed/pixelfed/artisan horizon
User=pixelfed
Restart=on-failure

[Install]
WantedBy=multi-user.target
pim@pixelfed:~$ sudo systemctl enable --now pixelfed
The other type of runner is periodic tasks, typically configured in a crontab, like so:
pim@pixelfed:~$ cat << EOF | sudo tee /etc/cron.d/pixelfed
* * * * * pixelfed      /usr/bin/php /data/pixelfed/pixelfed/artisan schedule:run >> /dev/null 2>&1
EOF
After running the schedule:run module once by hand, it exits cleanly, so I think this is good to go even though I’m not a huge fan of
redirecting output to /dev/null like that.
I will create one admin user on the commandline first:
pixelfed@pixelfed:/data/pixelfed/pixelfed$ php artisan user:create
And now that everything is ready, I can put the icing on the cake by enabling and starting the Apache2 webserver:
pim@pixelfed:~$ sudo a2enmod rewrite proxy proxy_fcgi
pim@pixelfed:~$ sudo a2ensite pixelfed
pim@pixelfed:~$ sudo systemctl restart apache2
Finishing Touches
File permissions
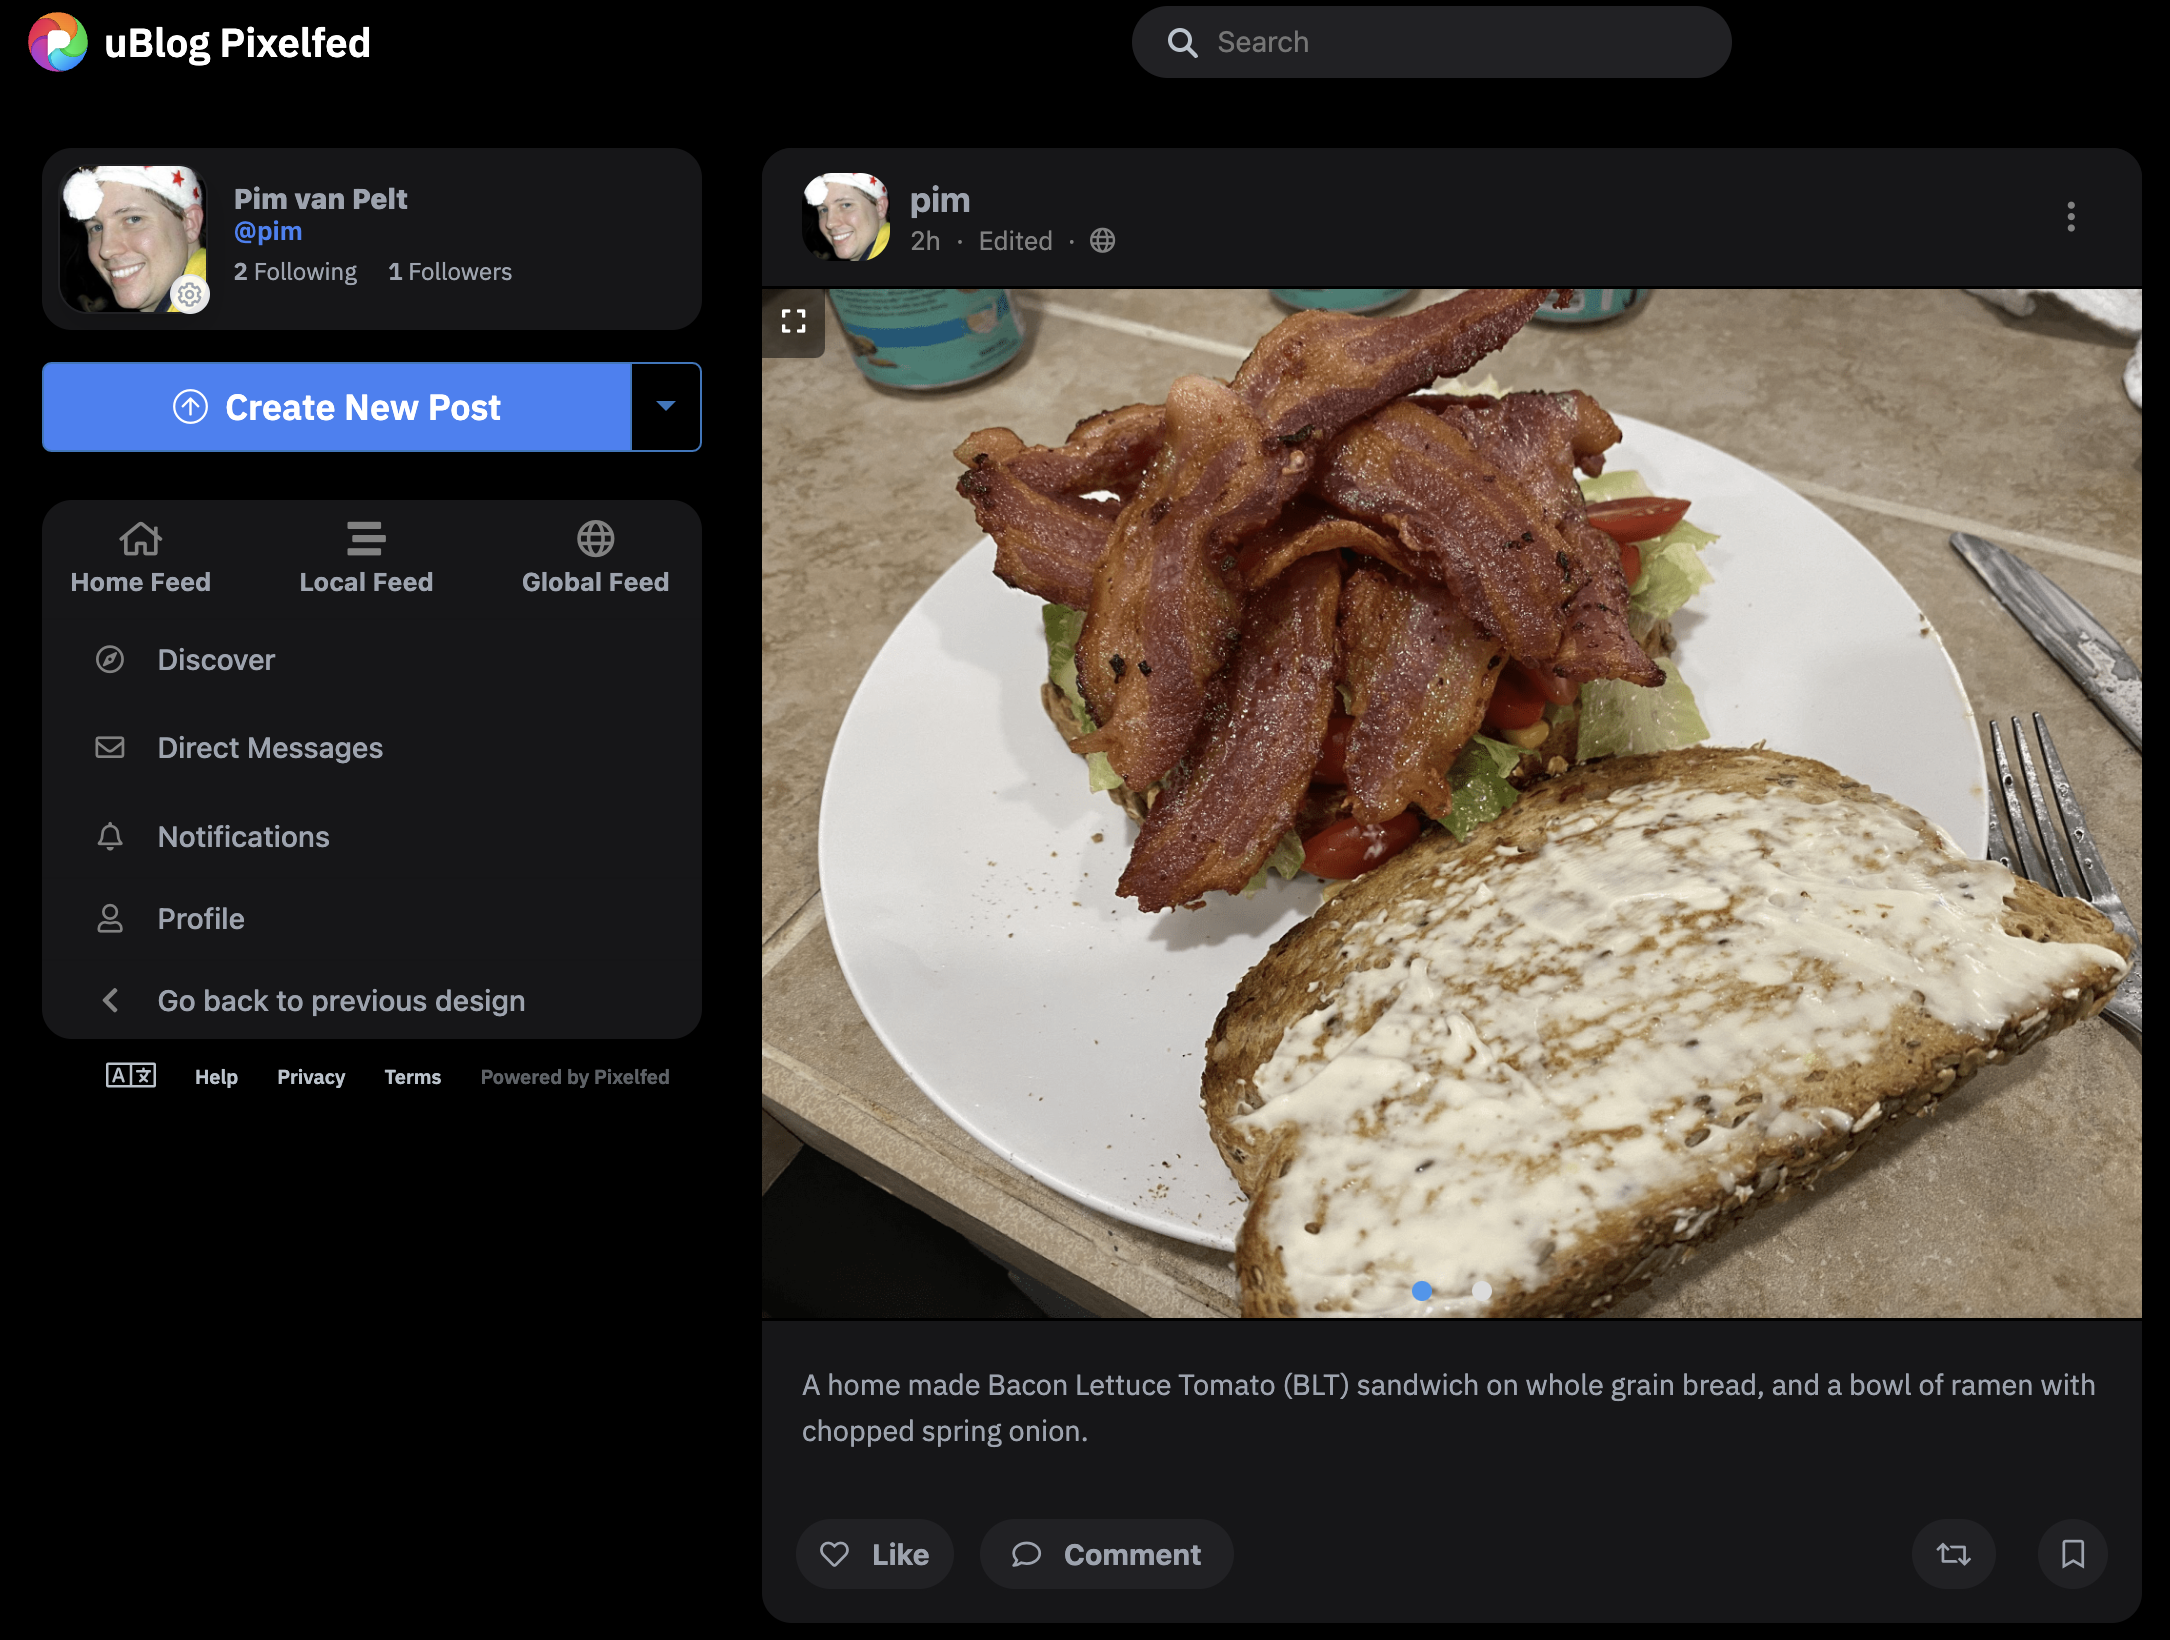
After signing up, logging in and uploading my first post (which is of a BLT sandwich and a bowl of noodles, of course),
I noticed that the permissions are overly strict, and the pictures I just uploaded are not visible. I noticed that the PHP FastCGI is
running as user pixelfed while the webserver is running as user www-data, and the former is writing files with permissions rw-------
and directories with rwx------, which doesn’t seem quite right to me, so I make a small edit in config/filesystems.php, changing the
0600 to 0644 and the 0700 to 0755, after which my post is visible.
uBlog’s logo

Although I do like the Pixelfed logo, I wanted to keep a ublog.tech branding, so I replaced the public/storage/headers/default.jpg
with my own mountains-picture in roughly the same size. By the way, I took that picture in Grindelwald, Switzerland during a
[serene moment] in which I discovered why tinkering with things like this is so important to my
mental health.
Backups
Of course, since Ramón is a good friend, I would not want to lose his pictures. Data integrity and durability is important to me. It’s the one thing that typically the commercial vendors do really well, and my pride prohibits me from losing data due to things like “disk failure” or “computer broken” or “datacenter on fire”.
To honor this promise, I handle backups in three main ways: zrepl(1), borg(1) and mysqldump(1).
- VM Block Devices are running on the hypervisor’s ZFS on either the SSD pool, or the disk pool, or both. Using a tool called zrepl(1) (which I described a little bit in a [previous post]), I create a snapshot every 12hrs on the local blockdevice, and incrementally copy away those snapshots daily to the remote fileservers.
pim@hvn0.ddln0:~$ sudo cat /etc/zrepl/zrepl.yaml
jobs:
- name: snap-libvirt
  type: snap
  filesystems: {
    "ssd-vol0/libvirt<": true,
    "ssd-vol1/libvirt<": true
  }
  snapshotting:
    type: periodic
    prefix: zrepl_
    interval: 12h
  pruning:
    keep:
      - type: grid
        grid: 4x12h(keep=all) | 7x1d
        regex: "^zrepl_.*"

- type: push
  name: "push-st0-chplo0"
  filesystems: {
    "ssd-vol0/libvirt<": true,
    "ssd-vol1/libvirt<": true
  }
  connect:
    type: ssh+stdinserver
    host: st0.chplo0.net.ipng.ch
    user: root
    port: 22
    identity_file: /etc/zrepl/ssh/identity
  snapshotting:
    type: manual
  send:
    encrypted: false
  pruning:
    keep_sender:
      - type: not_replicated
      - type: last_n
        count: 10
        regex: ^zrepl_.*$ # optional
    keep_receiver:
      - type: grid
        grid: 8x12h(keep=all) | 7x1d | 6x7d
        regex: "^zrepl_.*"
- Filesystem Backups make a daily copy of their entire VM filesystem using borgbackup(1) to a set of two remote fileservers. This way, the important file metadata, configs for the virtual machines, and so on, are all safely stored remotely.
pim@pixelfed:~$ sudo mkdir -p /etc/borgmatic/ssh
pim@pixelfed:~$ sudo ssh-keygen -t ecdsa -f /etc/borgmatic/ssh/identity -C root@pixelfed.net.ipng.ch
pim@pixelfed:~$ cat << EOF | sudo tee /etc/borgmatic/config.yaml
location:
  source_directories:
    - /
  repositories:
    - u022eaebe661@st0.chbtl0.ipng.ch:borg/{fqdn}
    - u022eaebe661@st0.chplo0.ipng.ch:borg/{fqdn}
  exclude_patterns:
    - /proc
    - /sys
    - /dev
    - /run
    - /swap.img
  exclude_if_present:
    - .nobackup
    - .borgskip
storage:
  encryption_passphrase: <redacted>
  ssh_command: "ssh -i /etc/borgmatic/identity -6"
  compression: lz4
  umask: 0077
  lock_wait: 5
retention:
  keep_daily: 7
  keep_weekly: 4
  keep_monthly: 6
consistency:
  checks:
    - repository
    - archives
  check_last: 3
output:
  color: false
- MySQL has a running binary log to recover from failures/restarts, but I also run a daily mysqldump(1) operation that dumps the database to the local filesystem, allowing for quick and painless recovery. As the dump is a regular file on the filesystem, it’ll be picked up by the filesystem backup every night as well, for long term and off-site safety.
pim@pixelfed:~$ sudo zfs create data/mysql-backups
pim@pixelfed:~$ cat << EOF | sudo tee /etc/cron.d/bitcron
25 5 * * * root /usr/local/bin/bitcron mysql-backup.cron
EOF
For my friends at AS12859 [bit.nl], I still use bitcron(1) :-) For the rest of you – bitcron is a little wrapper
written in Bash that defines a few primitives such as logging, iteration, info/warning/error/fatals etc, and then runs whatever you define
in a function called bitcron_main(), sending e-mail to an operator only if there are warnings or errors, and otherwise logging to
/var/log/bitcron. The gist of the mysql-backup bitcron is this:
echo "Rotating the $DESTDIR directory"
rotate 10
echo "Done (rotate)"
echo ""

echo "Creating $DESTDIR/0/ to store today's backup"
mkdir -p $DESTDIR/0 || fatal "Could not create $DESTDIR/0/"
echo "Done (mkdir)"
echo ""

echo "Fetching databases"
DBS=$(echo 'show databases' | mysql -u$MYSQLUSER -p$MYSQLPASS | egrep -v '^Database')
echo "Done (fetching DBs)"
echo ""

echo "Backing up all databases"
for DB in $DBS;
do
  echo " * Database $DB"
  mysqldump --single-transaction -u$MYSQLUSER -p$MYSQLPASS -a $DB | gzip -9 -c \
    > $DESTDIR/0/mysqldump_$DB.gz \
    || warning "Could not dump database $DB"
done
echo "Done backing up all databases"
echo ""
What’s next
Now that the server is up, and I have a small amount of users (mostly folks I know from the tech industry), I took some time to explore both the Fediverse, reach out to friends old and new, participate in a few random discussions possibly about food, datacenter pics and camping trips, as well as fiddle with the iOS and Android apps (for now, I’ve settled on Vernissage after switching my iPhone away from the horrible HEIC format which literally nobody supports). This is going to be fun :)
Now, I think I’m ready to further productionize the experience. It’s important to monitor these applications, so in an upcoming post I’ll be looking at how to do blackbox and whitebox monitoring on this instance.
If you’re looking for a home, feel free to sign up at https://pix.ublog.tech/ as I’m sure that having a bit more load / traffic on this instance will allow me to learn (and in turn, to share with others)! Of course, my Mastodon instance at https://ublog.tech/ is also happy to serve.